Sunday, May 16, 2010

Gluten Free Sugar Cookies

P1030651-1.jpg picture by nantzie

(If you've linked over from Works for Me Wednesday or Gluten Free Wednesdays, welcome. I'm glad you stopped by. )

When I first went gluten free, one of the things I thought I'd never have again was really good cookies. My parents and I used to spend days making Christmas cookies of all kinds. Everything from sugar cookies to pecan balls to Scandinavian cookies like krum kakor and fattigman. It was the only thing I really was sad about leaving behind.


Once I found the gluten free flour mix I use for baking, I was really happy. I made all of those cookies that I grew up with. I was in heaven. Those flavors that I never thought I'd taste again were back. It was wonderful.

The only cookie recipe that didn't translate well was the roll out sugar cookies. I mean they were okay, but the dough was really tempermental. It cracked easily and had to be babied. You had to refrigerate the dough, then roll it out, then it would warm up and want to break. So then you had to put the rolled out dough back in the refrigerator, then cut the cookies, refrigerate it again, then transfer the cookies to the baking sheet. WAY too much trouble for just an okay cookie. Over the years I've tried other recipes and they all were just okay or the dough drove me up the wall.

This past holiday season, I started to look at cookie decorating blogs and was inspired to try it. I tried the recipe that Bridget at Bake at 350 uses and just modified it. You can find her recipe HERE. It ended up being fantastic. It doesn't have to be babied at all and it tastes wonderful. All you need to do is substitute my flour mix, make sure your baking powder and your extracts are GF and that's it. I use Clabber Girl baking powder and McCormick Pure Vanilla and Pure Almond extracts.

You don't have to refrigerate this dough or baby it at all. I usually let the dough sit for maybe 15 minutes in the bowl to rest and make sure the flour and the wet ingredients have melded together. I also use a bit less flour. Maybe 2-3/4 cups rather than the full 3 cups. What you're looking for is a workable dough just like regular sugar cookie dough. Here's my version of the recipe -

Gluten Free Sugar Cookies

2 tsp baking powder
1 cup sugar
2 sticks softened butter
1 egg
1/2 tsp pure vanilla extract
1/2 tsp pure almond extract

Important Note: If you're a gluten eater who is making these for a gluten free friend or loved one (or if you're new to gluten free), you will need the following additional newly purchased equipment - rolling pin, rolling surface, baking sheet, and a whisk if you use one (or use a fork instead). Gluten is sticky and tends to stick to the grooves, grain and scratches in these items and commonly comes off in the food in amounts that are more than enough to cause your loved one a reaction. Your baking powder and sugar also needs to be new. If you are using a stand mixer, wipe down the machine and make sure there aren't any bits of dried gluten-containing batters that you might touch and potentially transfer to the cookies. Use the paddle attachment on your mixer rather than the whisk and clean it thoroughly before using it to make sure there is no gluten stuck to it. For more information on cooking gluten free, see my series Gluten Free Cooking Tutorial for Gluten Eaters. It tells you everything you need to know to make these safely for your loved one.

Preheat oven to 325F. (I like my cookies to bake a little slower.) Combine flour and baking powder in a small bowl and set aside. Cream the butter and sugar together. Add the egg, sugar and extracts to the butter and sugar and mix. Gradually add the flour until it's combined into a workable dough. Add more flour if you need to or water if it's too dry. Let the dough rest for 15 minutes before working with it.

Use the same GF baking mix to roll out the dough. Cut it into cookies and bake until done. I'm really bad about keeping an eye on the time regarding how long to bake these. I tend to hover instead. Bridget's recipe says about 10-12 minutes, so I'd go by that. :)

Now for the royal icing. This is probably the most complicated part. Brace yourselves.

Ta Da!!!! I know.. It's so difficult. I think I may faint from the effort.

Aaaaanyway...

This is just like royal icing. It sets up and hardens so that you can stack the cookies. The bag says that the icing begins to set after about four minutes and you can stack the cookies after about four hours.

I used this white icing as my base. I bought several bags to make sure I had enough. I used food coloring (I used Wilton) to make the colors I wanted. I made three shades (light, medium and deep) of pink, purple and yellow, and I kept some white.

P1030631-1.jpg picture by nantzie

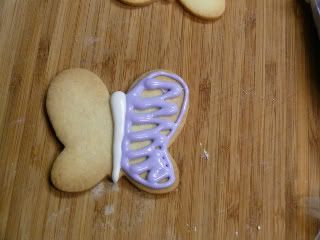
Use white to pipe the butterfly's body and then pipe around edge with your chosen color.

P1030632-1.jpg picture by nantzie

Fill in.

P1030635-1-1.jpg picture by nantzie

Spread the icing around with a toothpick.

P1030636-1.jpg picture by nantzie

All smooth. Ish. Hmm... Okay it's not really smooth, but it's smooth enough for me. Later on, I mixed in a little bit of water for my flood icing and it worked much better. This is the result with working with the icing right out of the tube. It all tastes the same anyway right?

Now for the fancy part. To make the pretty design, I used this technique that I saw on Sweetopia. The trick is that you have to do it while the icing is still wet, so you have to work fast.

P1030639-1-2.jpg picture by nantzie

Pipe the lines.

P1030640-1-1-1.jpg picture by nantzie P1030642-1-1.jpg picture by nantzie

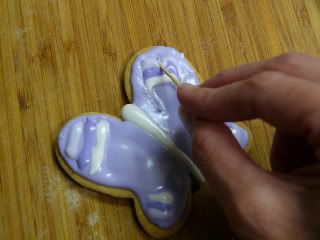
Drag the toothpick down the ends of the lines for a curved look.

P1030644-1-1.jpg picture by nantzie

Drag the toothpick down the middle of the lines.

P1030648-1-1.jpg picture by nantzie

Et voila!

I made these for my daughter's second grade class for her birthday. She said that everyone loved them. And there's nothing more honest than a second grader. One boy even asked if he could have another one. Score! Some of my non-GF friends also tasted them and they said that if I hadn't told them they were gluten free, you would never think they weren't regular cookies.

I love to hear things like that.

Wednesday, May 12, 2010

Gluten Free Favorites - BiAglut Pasta


(Note: This pasta is made with lupine flour, which is closely related to peanuts. If you are allergic to peanuts, you won't be able to eat this product.)

When you first go gluten free, you tend to get stuck on all of the things you can't have. You go to the local grocery store and find the two gluten free products they have and it's just awful. Nothing tastes right. Nothing has the same texture. When I first went gluten free, pasta was a disappointing experience at best.

Don't get me wrong. Most widely available gluten free pasta is okay. Many in a better than nothing kind of way unfortunately. I was fine with it. But my husband? He wasn't. He can't deal with weird textures. So when gluten free pasta fell apart or got mushy, he just couldn't eat it.

A few times I made two seperate pastas. Two pots of water. Two strainers. Two bowls. Too much work. Too much trouble. Too many chances for cross contact. It just wasn't worth it to me to have to go through that much work just have to pasta that was only so-so.

So for a while there, we just didn't have pasta. My husband doesn't have to eat gluten free, so if he really wanted pasta he'd just have it at lunch.

It wasn't long after that that I saw some people raving about Bi-Aglut Pasta. It's made in Italy with corn and lupine flours.

I found a place online that sells it and placed an order. I wasn't expecting much. I was just hoping for something that had a texture that my husband could tolerate a little better.

When we got it, I think Patrick made goulash. We had switched over to rice as the base rather than pasta. We figured if it was really awful we'd just make some rice. Like I said, we weren't expecting anything special. I had ordered fusilli, which is the spiral pasta.

Once the Bi-Aglut was cooked we were both really surprised at how well it held together. Then amazed at how much it tasted like regular pasta. Then just flabbergasted at the texture. It was perfect. I think we both said wow a dozen times while we were eating. It was holding its shape. It was when we went back for more and saw that the pasta in the strainer hadn't hardened up or disintigrated into tiny pieces that we were really sold. It looked and acted just as it had when we poured it into the strainer.

The best thing about this pasta is that you can serve it to non-GF people and they don't notice the difference. One year we hosted Christmas Eve and Patrick made his goulash with the Bi-Aglut Fusili. In the middle of the dinner, my mother-in-law asked me what I was eating with the goulash. It took me a minute to realize what she was asking. She thought that she and the rest of the family were eating regular pasta and I was eating something different. Now that's a testament to how good Bi-Aglut is.

You can find Bi-Aglut by doing a websearch. I usually order mine from Gluten Free Trading Company. None of my local gluten free stores carry it, so we order it by the case.

If you try Bi-Aglut pasta, let me know what you think, and what your non-GF friends and family think.

What are your gluten-free favorites?

Nancy

Sunday, May 2, 2010

Finding Gluten Free Products

When you're looking for gluten free products, the best place to start is with the food you already eat. Many mainstream food manufacturers have at least a few gluten free products. Most have either a phone number or website listed on their product labels. The phone numbers are great when you're in a store. All you have to do is call and ask. The drawback is that the phone number is usually only staffed during limited hours.

Personally, I prefer to visit the website. Some manufacturers have a gluten free product list in their FAQ or customer service section. If not, you can send an email asking if they have a gluten free product list, or if they don't, what their gluten labeling policy is. Some manufacturers only disclose wheat, while others go the extra mile and disclose any gluten-containing ingredient in any amount.

Another important thing to ask about is whether the product is made on gluten free equipment and/or in a gluten free facility. If you tend to be more sensitive than most, like me, this information can be very helpful. When a product I'm really interested in falls into this category, I ask the company if they can give me more information.

For example, when a product is made in a facility that also produces products containing gluten, all it ends up being is that there's gluten-containing soy sauce in a product three lines over in the same building. Which is no problem whatsoever. It's not like soy sauce is going to splash 50 feet from that line into my barbeque sauce.

On the other hand, if products containing wheat flour are made in the same building, I'd be very leery about trying it. With the large amounts of flour and large pieces of equipment that food manufacturers deal with, the flour usually gets dumped into the equipment. That creates a puff of flour that goes up into the air. They actually say that flour can be airborne for many hours and it will drift and settle on everything.

As far as products that are produced on the same equipment as gluten-containing foods, I've been surprised at the effort that some manufacturers go to to keep gluten out of food that is produced on the same equipment. Some manufacturers completely disassemble and steam clean the whole line before making gluten free foods. Others clean the line as best as they can and then throw away the first run of gluten free food so they can make sure that any gluten that might still be on the line comes off the equipment.

If you're unsure of a product, the manufacturer's response doesn't reassure you, you can't find any alternative product, and you REALLY want to try it, what I suggest you do first is to run a EZ Gluten Test on it.

You could just try it and see what happens, but I'd be very careful about that. Especially if you're new to the gluten free diet. Until you're really good at recognizing your symptoms, you can end up glutening yourself for weeks without realizing that that product is why you're not sleeping well or you're yelling at your kids about everything. I don't risk it very often because I'd rather miss out on a food than have my symptoms. In the four years I've been gluten free, I think I've done this two or three times. Once I did it while we were tent camping and it was really bad. One of the worst glutenings I've ever had.

Another thing you can do is do a web search and see if you can find anyone who is gluten free mention the product and their experience with it, or an alternative product they have found to replace it. Gluten free people tend to be an inventive bunch.

Once you find a gluten free product list or find out a manufacturers labeling policy, check back with them every once in a while. Products are taken off gluten free lists and other products are added from time to time.

Check with your local grocery stores as well. Safeway actually has a full list of all of their store brand products that are gluten free. All you have to do is email them and they'll send you the current list.

So don't be afraid to verify new things and branch out. The more products you are able to verify, the more food options you will have.

Monday, April 26, 2010

Absolutely Perfect Gluten-Free Flour Tortillas

(If you've linked over from Works for Me Wednesday or Gluten Free Wednesdays, I'm so excited for you to see this recipe. Let me know if you try it. It's really amazing. )

Oh yes. I. did! It's the holy grail people! They don't just bend. They ROLL. You could make those thin little taquitos out of these. And they're soft. I'm so EXCITED! You're not going to believe it. If you try these let me know what you think.

My decision to start developing this recipe began when I tried a GF flour tortilla recipe that turned out really good, but there were some problems. I wanted to see if I could make them better. I did a lot of research into what the traditional techniques were, as well as the ingredients. I watched YouTube videos with people showing how to make tortillas; everything from chefs to grandmas being filmed by their grandkids. All of that information helped me make a little change here and a little change there and I ended up turning it into a whole new recipe.

I've tested this recipe using shortening, lard and coconut oil. Every one of them works great. So no matter what you prefer to use, you're going to be able to make these.

The equipment I used that you may not have in your kitchen are a pastry cutter (you can use a fork), a griddle and a tortilla press. I only bought the tortilla press because it's faster when you're testing recipes. Rolling them out with a rolling pin was working fine.

To cook them I used my electric griddle and cranked it all the way up. Mine goes up to 400F. I cooked them right on the hottest part of the griddle. Right where the pancakes always burn. It worked perfectly.

Also, the damp towel seems to be one of the pieces of magic that makes these tortillas so soft and pliable. I'm sure it's the steam from all the heat in there after they're cooked. So don't skip that part.

Just to show you guys how good these are, I've made a little video. The only tortilla press I could find around here was a little six inch press. That's the only reason the tortilla is so small. I was making much bigger ones when I was rolling them with a rolling pin and they came out just as good.


Absolutely Perfect Gluten Free Flour Tortillas

1-1/4 tsp baking powder
1/2 tsp salt
4 tbsp lard, shortening or coconut oil
1 cup very hot water

Whisk the gluten free flour, baking powder and salt together to combine thoroughly. Add the shortening. Combine with a pastry cutter or fork until it resembles coarse crumbs. Add the hot water a bit at a time until combined into a workable dough. Wrap the dough in plastic and let it rest for half an hour.

Unwrap the dough and evaluate the texture. If the dough is too dry, add more water, a bit at a time. If too moist, add more flour. I good way to check the texture is to roll a pecan-sized piece into a ball and then squash it with your thumb. If it pretty much stays together, you're good. If it sticks to your hands it's too wet. If it crumbles apart and doesn't want to stay together, it's too dry.

Divide the dough into 12 equal pieces and roll into balls. Cover loosely with plastic to keep them from drying out.

Take a resealable, gallon-sized plastic bag and use scissors to cut off the top and down the sides, so you have a rectangular sheet. Put a dough ball on the plastic sheet, folding the other end of the plastic over the top of the dough ball.

If using a rolling pin, flatten the dough ball with your hand, then use a rolling pin to roll it out.

If using a tortilla press, place the plastic-covered dough ball into the press, a bit off center and press.

Peel one side of the plastic off the tortilla and invert it onto your hand. Slowly and carefully, peel the plastic off the other side of the tortilla.

Place the tortilla on a very hot griddle. Cook on one side just until bubbles start forming throughout the surface of the tortilla. Flip it over and cook that side about the same length of time. Flip it back and forth every 20-30 seconds or so until you get a bit of browning on the bubbles.

Cover your finished tortillas with a damp towel as they come off the griddle.

Enjoy!

Friday, April 23, 2010

Taco Night!

This was one of the first things I realized I could make from mainstream ingredients. And, all it requires as far as cooking skills is browning hamburger. Which was right in my comfort zone. I make this at least once a week and used the taco meat for tacos, tostadas, taco salad, etc.

This is the type of recipe I think of when I think of the people who have just found out they have to eat gluten free, but don't really know how to cook. Like I was. So that's my frame of mind in writing this. It might be over-explaining for some, but for people just learning how to cook I hope it's helpful. As far as the product recommendations go, I'm sure there are other brands of these products that are gluten free. This is just what we've used for years. And it will make it easy for you if you just want to know what to get without having to make a bunch of phone calls to verify everything.

First you'll need a package of hamburger meat, or ground turkey, whatever you like. Brown that in a pan until it's done and drain the fat off. Add a packet of McCormick Original Taco seasoning.


Be sure to read the ingredients on the back of the package to make sure there isn't any gluten. Ingredients can and DO change. McCormick will fully disclose any gluten in plain English and won't hide it in vague language such as "natural flavors" or "spices". I know for sure the Original is GF. Not sure if the Hot or Mild is. I know the Cheesy Taco mix has wheat in it.

If you like to make your own taco seasonings, all McCormick single ingredient spices are gluten free. We're talking the little jars of "Cumin" or "Cayenne Pepper" or "Garlic Powder". Anything else you need to read the ingredients label to make sure McCormick hasn't included gluten of any kind.

So once your hamburger meat is done and you've drained the fat off, follow the package directions - dump the seasoning in, put in some water, let it cook until the water and seasonings are absorbed and the taco meat looks dry-ish. You don't want it watery. If it's still watery, let it cook some more.

Let's move on to the fixin's. Mission Taco Shells, Kraft shredded cheese, Daisy sour cream, Herdez salsa, Fresh Express shredded lettuce, Rosarita Traditional Refried Beans and Mission Tortilla Chips.

Taco Shells
Herdez® Salsa Cesera


You can use any kind of fresh veggies to add to this. Chop up some tomatoes or onions. Make some fresh guacamole. All fresh veggies and fruit are gluten free.

Enjoy!


Recipe Development

I spent most of the day researching, developing and testing a recipe I'm working on.

Let me just say how surreal it is for me to say that. By the time I graduated from high school, I didn't even know how to brown hamburger meat. I knew how to bake. Mostly cookies. I made bread several times. It was even edible once or twice. (badumpbump!)

I learned a few things over the years, but just enough to get by. Before I went gluten free, I barely cooked at all. I could make dinner, but I never really knew how to cook. Let's just say that I could do everything they asked me to do on the back of a box of Hamburger Helper. There were a couple "from scratch" recipes I knew how to make, but the only additional skill those recipes required was chopping an onion. Which I didn't even do most of the time because they sell prechopped onions right by the bagged salad at the grocery store. I did make pot roast using the bag and season packet a few times, so I quartered some potatoes for that.

I was comfortable browning hamburger meat, chopping an onion (if I had to), doing that bag and season roast, cooking pasta and... I think that's about it. I couldn't have told you what I was supposed to do with a steak. As for chicken.. Chicken scared the heck out of me. You have to be careful with raw chicken or you could DIE. You have to cook it all the way or you could DIE. Seriously. I can't deal with that kind of pressure. When I did cook chicken I was so freaked out about making sure it was done that I cooked it so long it was dead all over again.

When I went gluten free, I spent the first few weeks just trying to figure out what I could eat that wouldn't make me sick. I ate like a teenage boy trapped in a convenience store. Cool Ranch Doritos are gluten free? Awesome! I also discovered that most flavors of EZ Cheese, that aerosol spray cheese, are gluten free. So are cheetos, lots of different candy, some chips and salsa, peanut butter, soda, some mixed nuts, etc.

I've come a LONG way since then. There isn't much I don't know how to do as far as basic cooking goes. And more advanced cooking techniques don't intimidate me like they used to. I'm willing to try just about anything.

I'm not so worried anymore about wasting food. I used to be so worried about it that I wouldn't try making anything. I figured whatever I made wouldn't be as good. Now I figure why not try something. It might be awesome.

My husband is even more adventurous than I am. He's the better cook in the family. He likes the process. The chopping, the prepping, the simmering, the stirring.

The waiting. And the more waiting.

(...)

I'm not so much with the waiting.

I'm more of an end result kind of girl. I want to see if what I'm doing is going to turn out like I want it to.

This recipe that I'm working on is a baking recipe actually. It's the first time that I've tried to take something that was pretty darn good, but I wanted to see if I could make better and more dependable from a gluten-free standpoint. It's a traditional recipe that has been made from scratch for probably hundreds of years. So I'm going back to basics and figuring out some of those traditional techniques and see if they transfer to the gluten free version.

That's one thing that I've learned. Sometimes it's not the gluten, but the technique that makes the recipe do what it does. It's really quite amazing. One of these days I swear I'm going to try pita bread, which I've never been a fan of, JUST to see if I can get it to do that splitty thing.

I had a lot of fun today. I'm not quite there with this recipe. I've done a pretty standard, modern version of the traditional recipe. The one that most gluten-eaters who make this from scratch use. But then there are some people who go really old school with it and use an ingredient that I've never used before that they say is the key to an even better result. So I'm going to see what I can do to find that final ingredient that I need.

I did do some pretty successful temperature testing today though. Now I know cooking it hotter and faster is the technique I need to use. So we'll see if the traditional ingredient helps our gluten-free flour do it's thing just a little bit better.


Wednesday, April 21, 2010

Gluten Free Croutons

In my early days of being gluten free, I found replacement products for a lot of stuff, but never did find croutons. As far as I'm concerned, a salad isn't a salad without croutons. This was the first thing I ever figured out and made on my own. This was also the first gluten free recipe that my husband really liked. It was the beginning of hope for a truly delicious gluten free future.

These croutons are very popular around here. Not just with us, but with our gluten eating friends. I just put these out in a bowl and people eat them like snack food.

If you live near a Whole Foods, most of the work that goes into making these croutons is done for you. In the Gluten Free freezer section, with the breads, scones, etc, you should see Gluten Free Stuffing cubes.


Photobucket

I usually get two containers of them so there's plenty for first night snacking and then some left over for the next few days. They come frozen so make sure you set them out to thaw before making them into croutons.

In my early gluten free days, Whole Foods didn't have these, so I was just using my favorite gluten free bread. Just bake a loaf, let it cool and cut it into crouton-sized cubes.

Picture 209


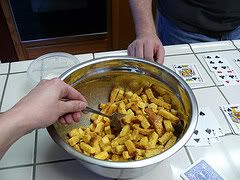
Dump the two containers of stuffing cubes in a bowl. Melt a whole stick of real butter, or your favorite butter substitute. Add garlic powder to taste. We like our's really garlicky, so we add quite a bit.

You can also use real garlic instead of garlic powder. But I'm all about making cooking as easy as possible. I figure I'm already making croutons from scratch so I'll just use the garlic powder.

4388574047_eca6851e6b_m-1.jpg picture by nantzie 4388574603_88581ef77a_m-1.jpg picture by nantzie

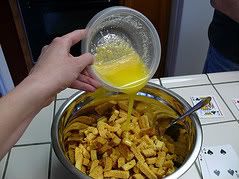
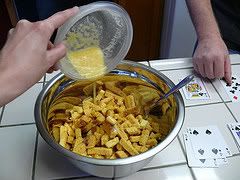
Pour the butter and garlic powder mixture over the stuffing cubes. Even that goo at the bottom. Especially the goo at the bottom. It's not pretty, but it's going to be yummy. Trust me on this.

4388575223_082123ff58_m-1.jpg picture by nantzie

Stir it all up and wait about five minutes to let the butter and garlic soak in a bit. Then stir it again to make sure you're not leaving any of that garlicky butter at the bottom of the bowl.
4388575641_9693ae6ab9_m-1.jpg picture by nantzie

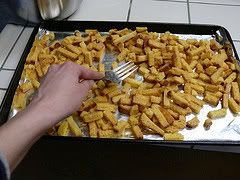
Pour the croutons onto a foil-lined baking sheet. Put them in a 250 degree oven and just keep an eye on them. I use a big plastic spoon to turn the croutons over so they cook evenly. They'll turn a deeper golden brown when they're done.

If you're using fresh gluten free bread rather than Whole Foods' stuffing cubes, which are already crunchy, you'll want to reduce the oven temp down to 200 or as low as it will go. With fresh bread you not only need to bake the butter and garlic into it, you need to get them dried out and crispy. Just keep an eye on them, taste occasionally to test the crunchiness and be patient with it. It's worth the wait.

Enjoy!