
(If you've linked over from Works for Me Wednesday or Gluten Free Wednesdays, welcome. I'm glad you stopped by. )
When I first went gluten free, one of the things I thought I'd never have again was really good cookies. My parents and I used to spend days making Christmas cookies of all kinds. Everything from sugar cookies to pecan balls to Scandinavian cookies like krum kakor and fattigman. It was the only thing I really was sad about leaving behind.





Once I found the gluten free flour mix I use for baking, I was really happy. I made all of those cookies that I grew up with. I was in heaven. Those flavors that I never thought I'd taste again were back. It was wonderful.
The only cookie recipe that didn't translate well was the roll out sugar cookies. I mean they were okay, but the dough was really tempermental. It cracked easily and had to be babied. You had to refrigerate the dough, then roll it out, then it would warm up and want to break. So then you had to put the rolled out dough back in the refrigerator, then cut the cookies, refrigerate it again, then transfer the cookies to the baking sheet. WAY too much trouble for just an okay cookie. Over the years I've tried other recipes and they all were just okay or the dough drove me up the wall.
This past holiday season, I started to look at cookie decorating blogs and was inspired to try it. I tried the recipe that Bridget at Bake at 350 uses and just modified it. You can find her recipe HERE. It ended up being fantastic. It doesn't have to be babied at all and it tastes wonderful. All you need to do is substitute my flour mix, make sure your baking powder and your extracts are GF and that's it. I use Clabber Girl baking powder and McCormick Pure Vanilla and Pure Almond extracts.
You don't have to refrigerate this dough or baby it at all. I usually let the dough sit for maybe 15 minutes in the bowl to rest and make sure the flour and the wet ingredients have melded together. I also use a bit less flour. Maybe 2-3/4 cups rather than the full 3 cups. What you're looking for is a workable dough just like regular sugar cookie dough. Here's my version of the recipe -
Gluten Free Sugar Cookies
2-3/4 cups Gluten Free Baking Mix
2 tsp baking powder
1 cup sugar
2 sticks softened butter
1 egg
1/2 tsp pure vanilla extract
1/2 tsp pure almond extract
Important Note: If you're a gluten eater who is making these for a gluten free friend or loved one (or if you're new to gluten free), you will need the following additional newly purchased equipment - rolling pin, rolling surface, baking sheet, and a whisk if you use one (or use a fork instead). Gluten is sticky and tends to stick to the grooves, grain and scratches in these items and commonly comes off in the food in amounts that are more than enough to cause your loved one a reaction. Your baking powder and sugar also needs to be new. If you are using a stand mixer, wipe down the machine and make sure there aren't any bits of dried gluten-containing batters that you might touch and potentially transfer to the cookies. Use the paddle attachment on your mixer rather than the whisk and clean it thoroughly before using it to make sure there is no gluten stuck to it. For more information on cooking gluten free, see my series Gluten Free Cooking Tutorial for Gluten Eaters. It tells you everything you need to know to make these safely for your loved one.
Preheat oven to 325F. (I like my cookies to bake a little slower.) Combine flour and baking powder in a small bowl and set aside. Cream the butter and sugar together. Add the egg, sugar and extracts to the butter and sugar and mix. Gradually add the flour until it's combined into a workable dough. Add more flour if you need to or water if it's too dry. Let the dough rest for 15 minutes before working with it.
Use the same GF baking mix to roll out the dough. Cut it into cookies and bake until done. I'm really bad about keeping an eye on the time regarding how long to bake these. I tend to hover instead. Bridget's recipe says about 10-12 minutes, so I'd go by that. :)
Now for the royal icing. This is probably the most complicated part. Brace yourselves.

Ta Da!!!! I know.. It's so difficult. I think I may faint from the effort.
Aaaaanyway...
This is just like royal icing. It sets up and hardens so that you can stack the cookies. The bag says that the icing begins to set after about four minutes and you can stack the cookies after about four hours.
I used this white icing as my base. I bought several bags to make sure I had enough. I used food coloring (I used Wilton) to make the colors I wanted. I made three shades (light, medium and deep) of pink, purple and yellow, and I kept some white.

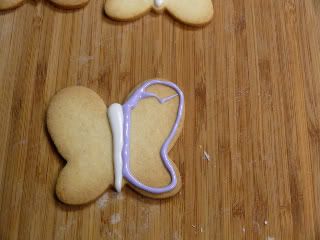
Use white to pipe the butterfly's body and then pipe around edge with your chosen color.

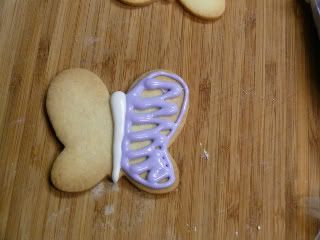
Fill in.

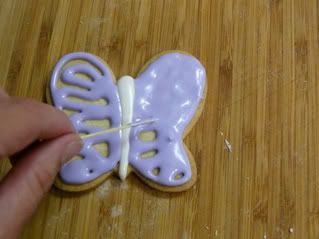
Spread the icing around with a toothpick.

All smooth. Ish. Hmm... Okay it's not really smooth, but it's smooth enough for me. Later on, I mixed in a little bit of water for my flood icing and it worked much better. This is the result with working with the icing right out of the tube. It all tastes the same anyway right?
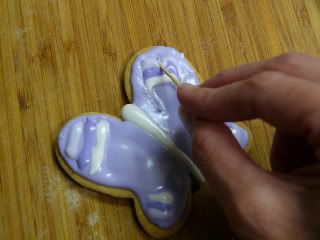
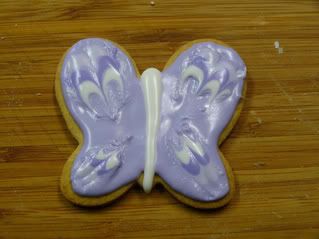
Now for the fancy part. To make the pretty design, I used this technique that I saw on Sweetopia. The trick is that you have to do it while the icing is still wet, so you have to work fast.

Pipe the lines.


Drag the toothpick down the ends of the lines for a curved look.

Drag the toothpick down the middle of the lines.

Et voila!
I made these for my daughter's second grade class for her birthday. She said that everyone loved them. And there's nothing more honest than a second grader. One boy even asked if he could have another one. Score! Some of my non-GF friends also tasted them and they said that if I hadn't told them they were gluten free, you would never think they weren't regular cookies.
I love to hear things like that.
These are just GREAT!!! I love that you were able to do a gluten-free version! Thank you so much for letting me know...and thanks for the shout-out! :)
ReplyDeleteHappy(GF) baking!
Those are just beautiful. I love them!
ReplyDeleteThank you so much! Aren't they so cute? Thanks so much for visiting. :) Nancy
ReplyDeleteCame out great! only thing I would suggest to people is thicker is better, without gluten it tends to be a little more fragile (at least for me). Plus thicker makes for a great bite of cookie! :)
ReplyDeleteThanks Shane! I'm glad you liked them. :)
ReplyDelete