Showing posts with label gluten free. Show all posts

Friday, April 23, 2010

Taco Night!

This was one of the first things I realized I could make from mainstream ingredients. And, all it requires as far as cooking skills is browning hamburger. Which was right in my comfort zone. I make this at least once a week and used the taco meat for tacos, tostadas, taco salad, etc.

This is the type of recipe I think of when I think of the people who have just found out they have to eat gluten free, but don't really know how to cook. Like I was. So that's my frame of mind in writing this. It might be over-explaining for some, but for people just learning how to cook I hope it's helpful. As far as the product recommendations go, I'm sure there are other brands of these products that are gluten free. This is just what we've used for years. And it will make it easy for you if you just want to know what to get without having to make a bunch of phone calls to verify everything.

First you'll need a package of hamburger meat, or ground turkey, whatever you like. Brown that in a pan until it's done and drain the fat off. Add a packet of McCormick Original Taco seasoning.


Be sure to read the ingredients on the back of the package to make sure there isn't any gluten. Ingredients can and DO change. McCormick will fully disclose any gluten in plain English and won't hide it in vague language such as "natural flavors" or "spices". I know for sure the Original is GF. Not sure if the Hot or Mild is. I know the Cheesy Taco mix has wheat in it.

If you like to make your own taco seasonings, all McCormick single ingredient spices are gluten free. We're talking the little jars of "Cumin" or "Cayenne Pepper" or "Garlic Powder". Anything else you need to read the ingredients label to make sure McCormick hasn't included gluten of any kind.

So once your hamburger meat is done and you've drained the fat off, follow the package directions - dump the seasoning in, put in some water, let it cook until the water and seasonings are absorbed and the taco meat looks dry-ish. You don't want it watery. If it's still watery, let it cook some more.

Let's move on to the fixin's. Mission Taco Shells, Kraft shredded cheese, Daisy sour cream, Herdez salsa, Fresh Express shredded lettuce, Rosarita Traditional Refried Beans and Mission Tortilla Chips.

Taco Shells
Herdez® Salsa Cesera


You can use any kind of fresh veggies to add to this. Chop up some tomatoes or onions. Make some fresh guacamole. All fresh veggies and fruit are gluten free.

Enjoy!


Wednesday, April 21, 2010

Gluten Free Croutons

In my early days of being gluten free, I found replacement products for a lot of stuff, but never did find croutons. As far as I'm concerned, a salad isn't a salad without croutons. This was the first thing I ever figured out and made on my own. This was also the first gluten free recipe that my husband really liked. It was the beginning of hope for a truly delicious gluten free future.

These croutons are very popular around here. Not just with us, but with our gluten eating friends. I just put these out in a bowl and people eat them like snack food.

If you live near a Whole Foods, most of the work that goes into making these croutons is done for you. In the Gluten Free freezer section, with the breads, scones, etc, you should see Gluten Free Stuffing cubes.


Photobucket

I usually get two containers of them so there's plenty for first night snacking and then some left over for the next few days. They come frozen so make sure you set them out to thaw before making them into croutons.

In my early gluten free days, Whole Foods didn't have these, so I was just using my favorite gluten free bread. Just bake a loaf, let it cool and cut it into crouton-sized cubes.

Picture 209


Dump the two containers of stuffing cubes in a bowl. Melt a whole stick of real butter, or your favorite butter substitute. Add garlic powder to taste. We like our's really garlicky, so we add quite a bit.

You can also use real garlic instead of garlic powder. But I'm all about making cooking as easy as possible. I figure I'm already making croutons from scratch so I'll just use the garlic powder.

4388574047_eca6851e6b_m-1.jpg picture by nantzie 4388574603_88581ef77a_m-1.jpg picture by nantzie

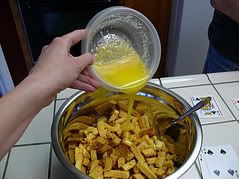
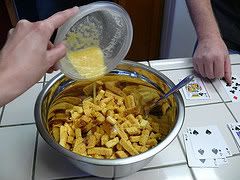
Pour the butter and garlic powder mixture over the stuffing cubes. Even that goo at the bottom. Especially the goo at the bottom. It's not pretty, but it's going to be yummy. Trust me on this.

4388575223_082123ff58_m-1.jpg picture by nantzie

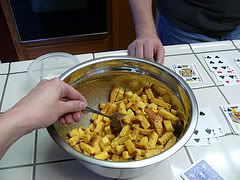
Stir it all up and wait about five minutes to let the butter and garlic soak in a bit. Then stir it again to make sure you're not leaving any of that garlicky butter at the bottom of the bowl.
4388575641_9693ae6ab9_m-1.jpg picture by nantzie

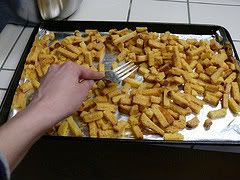
Pour the croutons onto a foil-lined baking sheet. Put them in a 250 degree oven and just keep an eye on them. I use a big plastic spoon to turn the croutons over so they cook evenly. They'll turn a deeper golden brown when they're done.

If you're using fresh gluten free bread rather than Whole Foods' stuffing cubes, which are already crunchy, you'll want to reduce the oven temp down to 200 or as low as it will go. With fresh bread you not only need to bake the butter and garlic into it, you need to get them dried out and crispy. Just keep an eye on them, taste occasionally to test the crunchiness and be patient with it. It's worth the wait.

Enjoy!

Gluten Free Cooking Tutorial for Gluten Eaters - Part 3 - Jump!

Okay. You've got your recipe. You've asked your gluten-free loved one if it's okay for you to cook for them. You've gotten their advice and recommendations on ingredients. You've verified that your ingredients are gluten free. You might have even bought a new cutting board or a new strainer. You're ready.

So let's get started.

1. Take a Deep Breath. We're going to take this step by step. Everything is going to turn out great.

2. Inform the Other People in Your House What You Are Doing. Let everybody know that you're making a special dish and there will be no touching or tasting of anything in the kitchen until you are done.

3. Re-Read Your Recipe. Make sure you have all of the ingredients and all of the food prep items (bowls, knives, cutting boards, measuring spoons and cups, etc.) you need. Make sure all of your food prep items are clean and ready to go.

4. Wash Your Hands. I'm only saying this once, but you should wash your hands a LOT when cooking gluten free food in a non-gluten-free kitchen. Use gluten free soap and use a clean dishtowel to dry your hands. You could completely clean your whole kitchen and wipe down every surface to make sure there isn't gluten on it, but who wants to do that? Not me, that's for sure. Need to get your kid a snack? Wash your hands when you're done. Answer the phone? Wash your hands when you're done. The way I've learned to navigate in a non-gluten free kitchen is just wash my hands before I touch my gluten-free food or food prep items. Once I've had to break the "gluten free zone" and handle something I'm not sure is gluten free, I wash my hands.

5. Clean Your Food Prep Surfaces. Clean off the counter you will be working on. Even if the food won't directly touch the counter, your hands and other food prep items will.

6. Put All of Your Ingredients and Food Prep Items Out on Your Counter. You don't want to have to break your "gluten-free zone" if you don't need to.

7. Do Your Magic. It's cooking time baby!

8. Guard The Food. Walking away is asking for unknown fingers to gluten the food without you being aware of it. When the food is cooking and the whole house smells amazing, that's when your family will be tempted to sneak a bite without realizing it can cause a serious problem.

9. Promise the People in Your House That They Can Have Some When You're Done. If you're making your world famous chili, dish some out for your family. If you're making cookies, set some aside for them. Remember, we're just one person. We don't need the WHOLE THING. Although we probably could polish off a whole batch of cookies, we're definitely not going to be able to eat the whole pot of chili on our own.

10. Contain, Cover, Label and Secure. Once your food is cooked, put our portion in a container that can be covered. Label the container in some way. I love bright Post-It notes for this. I've found that just writing gluten free on the note doesn't give enough information if you need to keep other people out of the food that might not understand cross contact. Writing something like "UNCLE JIM ONLY - DO NOT OPEN" is more effective. I also recommend securing the lid in some way. A rubber band or tape usually works well. People tend to not read labels or notes when food is involved. Just about every container of food in your kitchen probably has words on the label, and it may not stop someone who is just going through the fridge on automatic looking for something to snack on. A rubber band or tape is just unusual enough that it will make someone stop and look at what they've got in their hands.

11. If Something Goes Wrong, Don't Serve it to Us. Just about every gluten free person I've ever encountered has glutened themselves in their own kitchen many times. Especially the first few weeks. All of this stuff is a lot to remember. If you're getting ready to put the chili in a container and you turn around to find your son dipping a piece of gluten bread in the chili to take a big bite, it's just over. There's nothing you can do. Don't worry about it. Your loved one will be grateful to you that you're putting their health above everything else. Hand your son a bowl and tell the rest of your family that dinner is ready.


Tuesday, April 20, 2010

Gluten Free Flour Mix for Baking

I use this mix as a 1 to 1 exact replacement in all of my cookie recipes, including my old family recipes. It’s never let me down. It’s also good if you like to eat some of the cookie dough because it doesn’t have any bean flour. If you’re using a flour mix that has bean flour in it don’t eat it. I know it smells good, but seriously. Don’t. I still have flashbacks from when I did that about four years ago. {shudder…}

I found the flour mix on page 6 of Annalise Roberts’ book – Gluten-Free Baking Classics. Make sure you get the extra fine rice flour. It is the reason this flour mix works. It’s very powdery. Not gritty at all. I think that one of the many reasons that GF products tend to fall apart is because the gritty rice flour doesn’t stick together well. With all of the other roadblocks to good GF baked goods, why not take one out of the equation. :)

For three cups of this flour mix you need:

2 cups Superfine Rice Flour (made by Authentic Foods)

2/3 cup Potato Starch (not potato flour)

1/3 cup Tapioca Flour (tapioca starch is the same thing in this case)

3/4 teaspoon xanthan gum

Mix all of this together thoroughly. I use a whisk to get it all mixed.

Now go make some chocolate chip cookies. And eat some cookie dough while you’re at it. Or dig out an old family cookie recipe and give it a try.

Locals note: If you live in the Sacramento, CA area, you can find the superfine rice flour at Sunrise Natural Foods in Roseville. For the tapioca and potato starches, as well as the xanthan gum, I use Bob's Red Mill (be sure to look for gluten free on the label), which can be found at Sunrise Natural Foods, Elliott's Natural Foods and some Raley's and Bel Air locations in their natural food section.